Save it for the bedroom
- susiejonesmedia
- Jan 8, 2022
- 5 min read
First off, if you know the song I've referenced in the title, we're instantly friends now! Those that don't, get your minds out of the gutter as this week I'm going to go through the work we did in the bedroom to make it one of the cosiest rooms I've ever been in.
I'll start off by saying that there was nothing wrong with the way the previous owner had the room, it just wasn't my taste. Anyway, I have managed to find some before pictures of the room from BoatShed (Boatshed are great, I purchased the boat through them) which I'll share below. A few things worth mentioning before I begin this long tale of how I basically redecorated a room:
The bedroom originally had a sink in (in total the boat had 4 sinks!)
Underneath the bed is the immersion heater (the thing that heats the water up), the bed had to be raised to fit the new one in!
There's a hatch by the door on floor which when opened presents you with the bilges (the lowest/bottom part of the boat that collects excess water and pumps it out)
Yes, that is carpet stuck to the wall
The problem I found with myself during this whole process is that I want everything to 'look nice' and I don't think too much about the practicality. So whilst we're on this topic we'll start with the walls
Wall skinning
As you can see in the images above the walls are made out of a melamine formaldehyde board, not dissimilar to kitchen cupboards. I wasn't a huge fan of this effect and toyed with a few ideas, I could paint it which I thought would be a bit bland or I could tongue and groove it which would look way cooler! However, I soon chucked that idea in the bin when I found out, one, how expensive it would be, and, two, how time consuming and tricky it would be.
But, I knew I wanted this effect on the majority of the walls in the bedroom (and throughout the rest of the boat) We looked at tongue and groove effect wallpaper which would have worked brilliantly but not so brilliantly when you consider the amount of moisture in the air. We were worried that the wallpaper would just peel off over time, so that was that option out. Enter the most difficult, fragile and damn right annoying material known to man.... self adhesive wallpaper/vinyl/film stuff. I kindly left this for my dad to do as he insisted it wouldn't be that
difficult (he was wrong)

Before any of the vinyl could be stuck to the wall, we had to get the carpet off (not as easy as it sounds) I can see why carpet was put on the wall, for insulation! You see, the bed is slightly smaller than a double and if there's more than one person in the bed it's a bit.... cosy, and whoever is closest to the wall gets a bit of a chill from it. Nonetheless, I wanted it gone. After a lot of swearing and frustration the carpet came off, then came more swearing and frustration putting the vinyl up. We (I say we it was my dad) used a squeegee to get the air bubbles out when applying it and as the vinyl is quite thin a stanley knife was used to trim the ends. Overall, I'm pretty happy with the end result, and so far it's managed to withstand the amount of moisture that builds up.
Paint
For the walls opposite the bed and for the cupboards, I decided that paint would be the better option. I tested a bunch of different paints to see what was the most durable and discovered that chalk paint was the best option for this. Craig & Rose 1829 Chalky Matt Emulsion Paint - Craftsmans White 5L to be exact, not the cheapest paint but it's done pretty well so far and hasn't chipped at all. I think it took about 3 coats to completely cover the wood beneath.
Sink removal, flooring and curtains
One of the first things we did was to remove the sink, again not as easy as it sounds. The sink was glued in and when taken out took most of the worktop surrounding it with it. I was then left with, well, a giant hole. To overcome this, I bought some cheap kitchen worktop from B&Q, my dad cut it to size and bobs your uncle, I now had a fairly large surface to shove all my crap on. As you can see from some of the before images above, there was a cupboard on the back wall, we removed this and replaced it with two shelves so I could shove more of my crap on them.
The flooring was fairly easy to lay, mainly because there isn't really a lot of floor space. I've gone with the same flooring throughout the boat which are a wood effect floor tile which stick onto pretty much any surface as long as it's clean and dry.
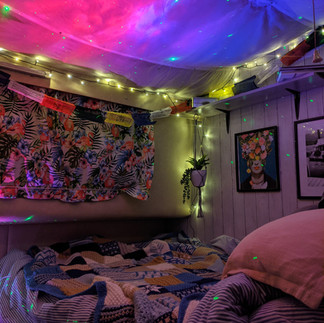
Now to my favourite bit, decor!! I went for a material that had the busiest pattern on, flamingos and palm leafs, because why not? My mum kindly made these into curtains for me by cutting and sewing them onto the original curtains. She also recovered the headboard with this material as well! The ceiling in the bedroom is a brown leather which I have covered with fabric and draped to allow the material underneath to breathe, we used velcro, glue and

drawing pins to make sure that it doesn't come down and smother me at night! I've also added some pictures and a shelf (another place to dump my crap on) to the back wall and put up fairly lights to make it feel a bit cosier.
To get over the chill from the back wall, i've placed cushions against it, two out of the many cushions were made by yours truly! I used the same material as the curtains for this and my mums expert help. Please note how chuffed I am with how they turned out. For all your cushion making needs I'm 100% not your person to go to as I cannot sew in a straight line to save my life! Please enjoy(?) a few images of the room. There's a couple of finishing touches that need to be done but it's pretty much there!
I'm not going to leave my music recommendation as an old emo/pop song by YouMeAtSix (I loved them so when I was a teenager!) but instead, I thought I'd leave you with a song that reminds me of the drives I had after work and at the weekend to the boat when we were doing her up. It's Blue Oyster Cult - (Don't Fear) The Reaper


Commentaires